Tuesday, August 17, 2010

Recipe: Fresh Corn Fritters


Photo by Sue Ferris

Yield: 4-6 large fritters (depending on size of your batter "drops")

Ingredients

¼ cup all-purpose flour
½ cold milk
pinch of salt
pinch of pepper (white or black)
1-2 dashes paprika
pinch of nutmeg (my addition)
1 teaspoon white sugar
2 eggs
handful of shredded cheese (your choice--I used mozzarella + parmesan)
1 cup fresh corn (approx 4-5 cobs depending on size)
1 Tablespoon oil
fresh chives, snipped
sour cream (for topping - optional)

Preparation

1. Add oil to a skillet or griddle and heat on medium high.

2. With a sharp knife, remove the corn from the cobs--just shave the meatiest part of the kernels off; the deeper part of the kernel is not as sweet.

3. Stir together all dry ingredients. Blend in eggs, milk, cheese, corn and chives until the mixture is somewhat like a thick pancake batter.

4. Drop by spoonful or ¼-½ cup measure into the hot oil in the pan. Fry until bubbles start to appear in the batter between the corn kernels. Flip and fry the reverse side until golden brown.

5. Remove and drain (if needed) on paper towels. Serve hot topped with sour cream and more chives if desired.

I saw these prepared on a public television cooking program. Over the weekend we scored some fresh corn from the Farmer's Market and I cooked up a batch of fritters...so delish! We were out of sour cream so I served ours over a bed of fresh baby spinach with just a squirt of ranch style dressing over the top.

Tuesday, April 6, 2010

Garden Inspiration: Straw Bale Method


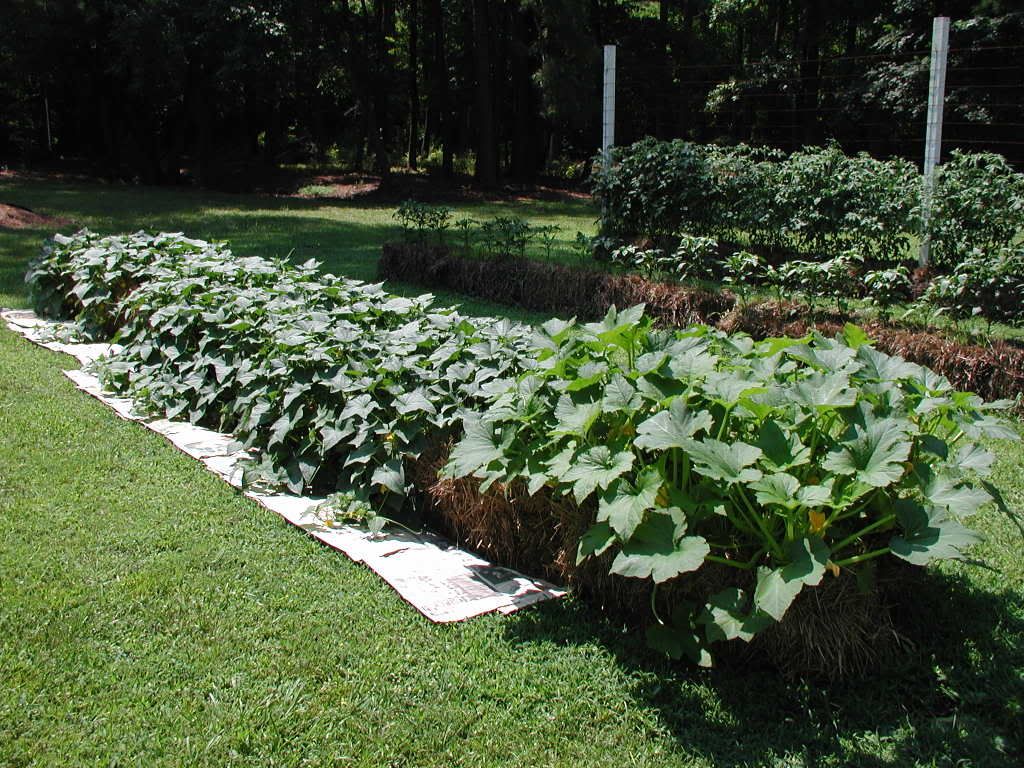
If you’re an urban gardener without enough space to grow even a tomato plant or two, “building” a garden with straw bales creates a new possibility. Rocky, uneven, or unyielding clay soil? Have difficulty stooping or bending to garden? With straw bales, you create the biodegradable equivalent of a raised bed. Plant a wonderful kitchen herb garden right next to your house, even on a concrete patio. Grow plants in a mud-free, weed-free medium that turns to mulch after a growing season or two. Straw Bale Gardening is simply a different type of container gardening. Put one on a balcony or a path or anywhere you have limited space.

Use one or multiple bales, arranging them in any pattern you like. The bales are raised but also be sure to allow for easy access to work in and around your garden. Wheat or oat straw is best as it's the stalks left from harvesting grain with very few seeds. Hay bales are less popular as they are made of whole plants with more seeds, and often other weeds in the mix. Use what you can get locally. You can get one good season out of a bale, sometimes two, but eventually it will decompose. Recycling into great compost or mulch when has eventually worn down is another bonus to this method!


Lay them lengthwise to make planting easy by just parting the straw. Make sure the string is running around each bale and not on the side touching the ground in case it's degradable twine.Keep the twine there to hold it all in place. If it starts to rot bang some stakes in at both ends, or chock up the ends with something heavy--rocks, bricks, boxes or planted containers.

Starting off with slightly aged bales of about 6 months is best, but if they're new, thoroughly soak with water and leave for five days until the temperature rises on the inside, then cools to be ready for planting. There won't be much composting inside yet as that can take months, but an initial hot cooking is not good for your plants.

The most frequent care is keeping things watered. Straw bale gardening uses more water than a normal garden, so set up a system and stick with it. In some areas a full watering can per day is enough, in warmer, drier areas keep the garden hose handy.

Straw bale gardening — plants to plant

Annuals of vegetables, herbs or flowers all work well. Remember your bales will be decomposed in 1-2 years. Young plants can go straight in. Pull apart or use a trowel, and depending on the state of the straw, mix a handful of compost soil in; then let the straw go back into place. Seeds can be planted on top if you put a layer of compost soil there first.

Top heavy veggies like corn don't work well, unless you grow dwarf varieties. With straw bale gardening staking is difficult so tomato plants will happily dangle over the edges. Each bale should take up to half a dozen trailing cucumbers, also try squash, zucchini or melons. Four pepper plants will fit in one bale or 12-15 bean or pea plants. You can add a plant or two of flowers around the edges--trailing varieties will spill over the sides and add color.

Once every 1-2 weeks water in a liquid organic feed, such as compost tea or fish emulsion. Add some earthworms on top of the soil if you want to use your bales for only one season. Pulling out any wayward grain seeds with straw bale gardening is quick and easy. Hay bales may need an occasional haircut rather than pulling the new sprouts out.

Friday, July 17, 2009

Recipe: Grilled bread with zucchini, ricotta and basil


4 1/2-inch-thick slices country bread
2 tablespoons olive oil
4 small zucchini (about 2 pounds), thinly sliced lengthwise
1 cup fresh basil, leaves torn
1/4 teaspoon crushed red pepper
kosher salt
1 cup fresh ricotta
Directions

Heat grill to medium-high. Brush the bread with 1 tablespoon of the oil and grill until golden and crisp, about 1 minute per side. Transfer to plates.

Grill the zucchini until tender and slightly charred, 3 to 4 minutes per side. Toss in a large bowl with the basil, red pepper, 1/2 teaspoon salt, and the remaining tablespoon of oil.

Top the bread with the zucchini and ricotta.

Might try this one over the weekend--hope yours is terrific, everyone!

Found HERE.

Saturday, May 16, 2009

Good People: Growing Gardens

Growing Gardens gets at the root of hunger right here in Portland, Oregon. The Portland Home Garden Project began in 1996. The organization's original focus was installing home gardens for low income households in Portland. The organization expanded its mission to build gardens in partnership with other organizations with the involvement of hundreds of community volunteers. The organization was renamed Growing Gardens in 1998. 


In 1999, Growing Gardens began offering workshops on topics such as basic gardening, composting, cooking and food preservation. An education and service-learning program for youth, called Youth Grow, began in 2000.

Organizing hundreds of volunteers, Growing Gardens builds organic, raised bed vegetable gardens in backyards, front yards, side yards and even on balconies. Supporting low income households for three years with seeds, plants, classes, mentors and more.  They offer Youth Grow after school garden clubs growing the next generation of veggie eaters and growers.  Through Learn & Grow workshops and work parties, they are teaching gardeners about growing, preparing and preserving healthful food while respecting the health of the environment.


Growing Gardens
 plants seeds for good food and healthy people by making sure low income people have the resources  they need to grow organic vegetables at home.  Through this work, community members meet over the backyard garden, through volunteering, by attending classes, and through sharing extra produce.


Portland Chickens!

A group of volunteers who seek to promote the joy of chickens and freedom to design and build small structures without permit requirements. The passion about Urban Chickens is for many reasons, here are a few: They bring us closer to the chain of life, they make great pets, fresh eggs, fertilizer for the garden, and they are Voracious Insect Eaters.


The Urban Chickens group has found a perfect match with non-profit Growing Gardens. Sign up for the Growing Gardens newsletter to receive information on Upcoming Portland Chicken Events.


For more info on Growing Gardens visit HERE.

Images copyright Growing Gardens & Jim Golden, 2009.

Wednesday, May 13, 2009

Garden: Grow veggies in 2-4 square feet


For anyone that loves fresh veggies but is short on space or maybe you just doesn't want the upkeep...this might be just your ticket for a mini garden this summer.  

TOMATO
In a sunny 2-foot square bed, tuck a single plant. Prolific varieties include 'Sun Gold', a cherry type, or 'Early Girl', a medium slicer. 

+ BASIL
In a 3-foot square bed, grow three basils and a tomato plant.  Perfect for making pesto and for pairing with tomatoes and mozzarella in summer salads.

+ CHIVES & CUKES
In a 4-foot square bed, add a row of chives beyond the basil, then plant a single cucumber vine.

Discovered HERE.

Wednesday, February 4, 2009

Recipe: Ribollita

Toasted bread, bean, and vegetable soup. Hearty, comfortable Tuscan veggie soup thickened with lots of day-old bread. Not too heavy since the bread is only on top, and the use of oil is minimal. How can you resist?


SERVES: 6 or 7 (7 cups)

TIME: About 50 minutes

YOU WILL NEED:

3 tbsp olive oil, divided
1/2 white onion, chopped
2 garlic cloves, minced
2 medium carrots, chopped into 1/2-in. pieces
2 celery stalks, chopped into 1-in. pieces
1 1/1 qts. chicken broth
1 can (15 oz) cannelloni beans, drained and rinsed
4 whole canned tomatoes, quartered, plus some juice
2 cups chopped Swiss chard
4 cups rough-textured day-old bread (try ciabatta), ripped into 1 1/2-in. pieces
Grated Parmesan cheese (optional...but who are we kidding, right?)

1. Heat 1 tbsp. olive oil in a large opt over medium heat. Add onion and garlic; cook until transparent, about 5 minutes. Add carrots, celery, and cook, stirring often, 5 minutes. Stir in broth and beans, then bring to a boil. Reduce heat, cover and simmer about 15 minutes. Add tomatoes and chard, simmer another 15 minutes, covered.

2. While the soup simmers, preheat oven to 350 degrees. Lay bread pieces on a rimmed baking sheet in a single layer. Drizzle with remaining 2 tbsp. olive oil and sprinkle with salt and pepper. Toast in oven just until golden, about 10 minutes. Set croutons aside.

3. Just before serving, add basil and cilantro and season to taste with salt and pepper.

4. Divide soup among serving bowls and top each with a few warm croutons. Grate Parmesan cheese directly over soup.

Per 1-cup serving: 212 cal., 41% from fat; 9.7 g protein; 9.9 g fat, 29 g carb, 4.7 g fiber; 812 mg sodium; 0 mg chol.

Recipe: Sunset Magazine, January 2009.