Thank you to Connie aka Thoughts of Creativity Bubbling Over, for selecting my entry as her giveaway winner! Connie just acquired a shiny new sewing machine, very appropriately named "Daisy", and my prize is a handmade tote bag! The twist to this prize is that I get to work with Connie and create the entire design...fabric, size, amount of pockets, features, handle length, the whole shebang. How totally terrific is THAT for a prize?
Connie is not only a stay-at-home-mommy but also a dancer and a creative designer who loves to make beautiful things, enjoys photography, and turns trash into treasure. She takes pride in keeping her "real" creations as earth friendly as possible and is drawn to the unexpected. First, pay a visit to her blog to admire her wonderful layout and an eye-popping banner. Second, head over to her Etsy shop, Zen Design Studio, and check out all the wonderful marketing goodies she offers for YOUR Etsy shop, website and blog!
Photos displayed in this post are the original design work of and copyright to Zen Design Studio 2009.
One of our BFF's, Miss Naomi Sohm, is coming to visit this evening. Due to our small space (and lack of dining chairs) we don't often entertain our friends so I decided to make it special. Dinner will be something I know how to cook but this is a new recipe to try. Roasted Garlic...need I say more?
Roasted Garlic:
2 heads garlic 2 tablespoons olive oil Salt
Pork Loin:
1 (3 1/2 to 4 1/2-pound) boneless pork loin Salt Freshly ground black pepper
Vinaigrette: Roasted garlic, recipe follows 1/4 cup chopped fresh parsley leaves 1/2 cup balsamic vinegar 3/4 cup extra-virgin olive oil 1 teaspoon sugar 1 teaspoon salt 1/2 teaspoon freshly ground black pepper 2 tablespoons water
Preheat the oven to 475 degrees F.
For the Roasted Garlic:
Cut the bulbs of garlic in half crosswise into a top and bottom. Place the garlic halves on a sheet of foil, drizzle with olive oil and sprinkle with salt. Fold the foil up and around the garlic halves, making sure they stay flat. Seal the foil into an airtight package. Roast until golden and soft, about 60 minutes. Keep the garlic in the foil and let cool slightly.
For the Pork: Place the pork loin in a medium, heavy roasting pan. Season all sides with salt and pepper. Place the pork in the oven 30 minutes after the garlic has started roasting. Roast until an instant-read thermometer registers 140 to 145 degrees F, about 30 to 40 minutes. Remove the roasting pan from the oven, tent the pork loin with foil, and let rest for 15 minutes.
For the Vinaigrette:
Remove the garlic from the foil. Remove the cloves by squeezing the base of the garlic. Place the garlic, parsley, and balsamic vinegar in a blender. Pulse the machine until blended. Drizzle the oil into the blender while the machine is running. Add the sugar, salt, pepper, and water and blend until incorporated.
To serve:
Slice the pork into 3/4-inch thick slices and transfer to a serving platter. Drizzle some of the vinaigrette over the pork and pass the remaining vinaigrette alongside the pork in a small dish.
12 Reasons People Fail and are Less Successful ...(or - "what I learned from twitter this morning")
1. They never define what being happy truly means to them.
What lifestyle do you truly desire and what do you need to do to achieve it?
2. Their goals are not really goals but a moving target that they will never hit.
This is what I need to do, this too, this too, oh and this too = too many goals.
3. Set goals they will never hit or that are impossible to achieve.
When someone says, “The Sky is the Limit!, they mean it. The more the better, and they’ll never be satisfied.
4. They don’t believe it can be done and never start.
There is too much competition already. It’ll be too hard to do and I don’t have enough time. I wish I could but I can’t.
5. They don’t make it a MUST.
Making it a must is more than just making it a priority. When you HAVE to do it it becomes essential to your survival. Just like food and water.
6. They don’t create a realistic plan.
They think or assume they can be successful but do no real research or planning. They just start things and “wing it” hoping everything will somehow work out.
7. They don’t follow through with the plan.
Why even create a plan for success if you’re not going to follow it? It’s like making a grocery list and not bringing it with you—you are bound to forget something.
8. They give others the responsibility to make things work for their life.
If you give someone responsibility you need to make sure they’re taking care of things. If they fail - you fail.
9. They give up when faced with a difficult challenge.
When facing a difficult challenge it’s easy to quit. Don’t quit until you achieve your goal.
10. They fail to conduct their life like a business.
Conduct a life like a business. At the end of the year you need to show profit and not debt. A successful business is showing profits at the end of the year and not increased debt.
11. They allow others optimism or pessimism to effect or control their decisions.
If someone tells you that it’s too late to make money on the Internet are you going to believe them? If a famous person endorses is that 'the thing to do'? How about if they tell you that you can make $1,000 a day without doing anything and just a little money using the Forex Autopilot software that sells for only $400? Do your research and make your own decision.
12. No quality coaching.
In order to effectively realize your own goals and stay motivated, the help of a quality coach or influence is essential to your success. Raising a well mannered child requires great parenting. In this analogy you are the child and your coach is the parent.
Something else to remember:
“The purpose of a goal is not the goal itself but what it makes of you along the way.” ~ Tony Robbins
Road to Antelope
12 THINGS FOUND HERE via twitter. Photograph copyright Pfeiffer Photos 2008 - all rights reserved. To purchase or view more of our work please visit my Etsy shop or contact me for more information...thanks!
Pfeiffer Photos: Tell us a bit about yourself name, location, affiliations and a bit of personal stuff.
Kim: My name is Kim Gadbois, I am a 25 year old artist from Montreal, Canada. I work 40 long hours a week in a video game company mostly trying to figure out a way to become a freelancer. I would either like to be my own boss or make a switch to work in the animation industry. I like chocolate cake, cats (I have the most adorable kitty) and my boyfriend, who is also an artist. I stated traveling last year and I can say that seeing the world and discovering more countries has quickly become one of my ongoing goals in life.
PP: Apart from creating art, what do you do?
Kim: I am a ballet dancer! Not professionally of course, but I started to dance when I was three years old and have continued to train at least once a week since. I must say that it is very difficult to find a balance between art and ballet because they are two activities that I have to squeeze into my spare time, and they both require a strong commitment in order to achieve success. Apart from these pursuits, I work every Saturday in a dance supply store. I sell pointe shoes and leotards all day long and I love it!
PP: What first made you want to become an artist?
Kim: Watching Disney's animated movies at a very early age , I knew that it was what I wanted to do. I wanted to become a Disney animator. I would spend my days copying VHS covers of the movies, practicing my coloring and painting skills, and imagining how great it must be to work for The Mouse. This ambition has stayed with me ever since but I realized my passion in animation school. When I learned that there are other jobs that support the animators in the industry--background painters, illustrators, in-betweeners--I decided perhaps that was the best route for my talents and interests.
PP: Please describe your creative process how, when, materials, etc.
Kim: I usually start with a quick sketch in my sketchbook. Depending if I want to make a painting or just a drawing, I will redo the sketch onto a canvas. This is the crucial step because sometimes I don't like the real drawing as much as the quick doodle I originally created and it takes time to figure out how to make it work for a finished piece. I also like to work digitally in Photoshop. In my Etsy shop, you will also find other art projects like crochet and Swarovsky rings. When I discovered Etsy in 2008, and I saw all of the different arts and crafts that people are offering there, I had a craft attack and wanted to try a bit of everything! I have finally decided to stick to promoting my drawings and paintings. I am also considering offering prints of my original works.
PP: What artists have influenced you and inspire you to create?
Kim: Apart from Disney artists in general, I have to say Eyvind Earl (who also worked for Disney). He was a genius background painter popular in the 1940's. He was the art director and painter for the Disney film, Sleeping Beauty. Earl had such a mad attention to details and his work is simply magical. I'd also have to include Marcel Marlier, a Belgian illustrator famous for creating the Martine series of children's books. These books contain some of the most beautiful illustrations I have ever seen in my life and it's notable that he dedicated all of his career to creating this series. I would say that you can find a little of his influence in my drawings. These days I am influenced and inspired by art blogs created by students from every animation school in the world. I follow bloggers living, studying and working in California, France and Canada--all three areas have a high concentration of talented artists. I spend a lot of time watching what other people are creating. It helps keep my creative juices flowing.
PP: Where else can people find your work?
Kim: I have a deviantART gallery with almost all of the illustrations I display on my blog, Pantoufle de verre. I also sell my acrylic paintings on Ebay but always announce these offerings on my blog first. I may attend the Toronto Fan Expo this year. It is a convention where you can sell anything related to comics or cartooning and meet up with other artists. Networking and making connections in the art world is always helpful to my career!
PP: Oh, and just what does Pantoufle de verre mean? Kim: The translated title of my blog would mean something like: Glass slipper in gravel!
The paintings, sketches, drawings, illustrations and animated film displayed in this post are the original creations of Kim Gadbois, and several can be found for sale in her Etsy shop, deviantART gallery and on Ebay. Enjoy more of Kim's work online at her Flickr Gallery.
Our laundry room is a shared space. We live in a four-plex with six other people, the laundry is in the basement. It's an unfinished, concrete, cobweb and florescent light basement. The machines are coin operated, white, and 100% utilitarian. Someday I hope to own a pair of those glorious front-loading laundry machines with the steam feature, thank-you-very-much. Oh, and, yes, I want the red! For now I will enjoy this lovely laundry room which has no red but is still quite wonderful.
This room makes me think of summertime. However impractical it might be, I really like that crazy goose neck lamp. Like the flag art (I bet I could replicate that), the exposed ceiling beams, the built in shelving and hooray for that sectional with the removable, washable slipcovers!
Last night, in between Academy Award segments, I viewed the 60-second True North commercial spot featuring the Inspiration Cafe. Today I decided to find out more about it.
Crystal on Leaves fine art photograph, Susan Loeb Chaplik
Dignity and Respect
Located in Uptown on Chicago's north side, Inspiration Cafe provides restaurant-style meals, case management, support groups, life-skills training, financial assistance and other services to homeless men and women in a therapeutic community that promotes dignity and respect.
Guests of the Cafe have access to the full range of Inspiration Corporation's programs, including employment training and career services, voice mail, and subsidized housing. Inspiration Cafe's goal is to help men and women overcome the causes of their homelessness and find stability by securing income and affordable housing.
Inspiration Cafe was founded in 1989 by Lisa Nigro, a Chicago police officer who began searching for a personal response to the homelessness she encountered in Uptown. She began by loading up a red wagon with sandwiches and coffee to distribute to homeless individuals on the streets.
One Inspired Evening
On March 13, 2009, Inspiration Cafe celebrates their 16th annual One Inspired Evening, which brings together more than 650 Chicago-area art lovers and friends of Inspiration Corporation for an evening of cocktails, live music, and live and silent auctions. Now that's inspiring!
My Dream Rome fine art photography, Jennifer Jackson
Read more about the Cafe, their mission and the Inspiration Corporation HERE.
Photos displayed in this post, and part of the text, was borrowed from the Inspiration Corporation website--for details, artist information and copyright information, please visit the links above.
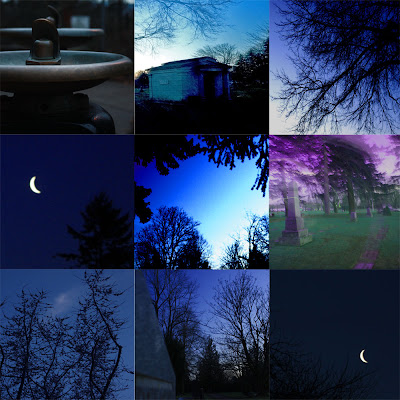
Our latest projects for Digital Photography class are displayed below. The objective was to create a mood through use of color and composition with up to 9 images displayed in a 3 x 3 grid layout. This one gave us some more Photoshop practice as well!
t 2 b: Solemn by Chris, Inspiration by Tina - Pfeiffer Photos 2009
Did we accomplish our task? As always, your feedback is very welcome!
It is official! My secret goal has been to gain a reader from each continent across the globe. My recent visitors tracker widget shows a visitor from Iceland--the last holdout to make my secret goal complete!
My thanks are warmly extended to each and every one of my visitors, casual readers and followers alike. I truly appreciate your interest and participation of my blogging adventures. I pledge to continue to do my best to keep you entertained, informed and inspired in my future posts and know that your kind comments, humor, suggestions and ideas are always very welcome!
Happy Friday--Happy Weekend!!
Coastal Wildflowers by Tina - Pfeiffer Photos 2008
Squash is such an underrated vegetable. I forget about squash myself until summer comes and the plants are lined up for sale at our local nursery. I like it best when it's in a recipe with other ingredients that highlight the rich flavor of the squash. This dish is next on my list to try with squash.
3 Tbsp. olive oil, plus 3 Tbsp. 1 pound butternut squash, trimmed and cut into 1-inch cubes* 2 garlic cloves, minced 1 teaspoon salt, plus one teaspoon 1/4 tsp. fresh ground black pepper, plus 1/2 teaspoon 1 cup vegetable stock 1 pound rigatoni 1 pound prawns, peeled and deveined 3/4 to 1 cup whole milk 1/2 cup chopped fresh basil leaves 1/4 cup grated Parmesan cheese
1. Warm 3 Tbsp. of olive oil in a large, heavy skillet over medium-high heat. Add the butternut squash, garlic, 1 tsp. salt, and 1/4 tsp. pepper. Saute until the squash is golden and tender, 5-7 minutes. Add the vegetable stock, bring to a simmer, cover and cook until the squash is very soft, another 5-7 minutes. Transfer the squash mixture to a blender or food processor and puree.
2. Bring a large pot of salted water to a boil over high heat. Add the pasta and cook until tender but still firm to the bite, stirring occasionally, about 8-10 minutes. Drain pasta.
3. While the pasta cooks, warm the remaining 3 Tbsp of olive oil in a large, heavy skillet over medium-high heat. Sprinkle the prawns with the remaining 1 tsp of salt and 1/2 tsp of pepper. Add the prawns to the pan and cook until just pink, about 3 minutes.
4. In a large pot over low heat combine the cooked pasta, pureed squash mixture, and 3/4 cup milk. Stir to combine. Add the remaining 1/4 cup milk if the sauce needs to be moistened. Add the cooked prawns, basil, and cheese. Stir until warm and serve.
Snapshots tell stories. Our stories, others stories, random memories and moments frozen in time. When framed alone, they can be too small to capture attention. To give them more presence try this creative display idea.
Displaying photos by color Grouping photos by color gives them visual unity (often not easy with 4x6 or 5x7 size prints), and it leaps outside of the traditional, "just-another-photo-getting-lost-on-my-wall" placement. If you've got more small prints (4x6, 5x7) than you know what to do with, this is a project you can put together in one afternoon.
Supplies:
2 poster frames, 22 x 28 in (56 x 71 cm) Poster board or gator board (sold in art-supply stores) Archival glue Brayer Measuring tape
A note about photo adhesives
Photo-safe adhesives include archival-quality photo corners, acid-free linen and paper tape, archival glue, and wheat and rice starch pasted hinges which are the best option for fragile, valuable images)
Do not use cellophane tape, rubber cement, or any hobby glue to adhere photos to a backing as these will all damage photos over time.
How To:
1. Cover a table with newspaper and gather all your unused photo prints that have yet to find a home in an album or frame. Sort the images by dominant color, blue for sky and water, red for the flowers from your last summer garden, etc. Try to have a good mix of people, places and things in each color stack.
2. Create a rough layout on your poster (or gator) board, keeping in mind the depth of your poster frame. Layer the photos to "crop" out parts your are not as partial to and to highlight the more interesting features.
3. When the arrangement is to your liking, use the archival glue or tape to secure the images to the board. Roll the edges of all the prints with a brayer to ensure they are firmly in place.
4. Let dry overnight, then set your finished collage into the poster frame and measure from the frame to the wire (as shown), to determine placement on your wall.
Last week I posted a simple question in the community forum on Etsy: "Why don't YOU buy fine art photography?" The response was overwhelming! The answers were varied, and there were some that popped up multiple times in the course of the thread. Most were about display concerns (ease of install, lack of space), size of prints (larger is popular--who would have guessed?!), and issues with framing (what to use, how to do, how many to choose, etc.)
This post is PART ONE in my new series called Creative displays for photography & art. I am writing this series with the hope of sharing fresh ways to look at your fine art and fine art photography pieces and to inspire you to seek out more. Please visit again for future posts with ideas, how-tos and photos to push the traditional "frame-it-hang-it" aside and have more FUN in your space!
Vinaigrette 1/4 cup white balsamic vinegar 1 shallot, minced 6 Tbsp. extra-virgin olive oil 1/2 tsp. kosher salt 1/4 tsp. fresh ground black pepper
Salad 3 apricots, halved, stones removed (peaches, plums, red apples or figs are alternatives) 1 Tbsp. extra-virgin olive oil 3 ounces pancetta, thinly sliced 8 cups baby arugula 1/2 cup coarsely chopped, skinned and toasted hazelnuts
For the Vinaigrette: Combine the balsamic vinegar and shallot in a small bowl. Slowly pour the olive oil into the bowl, whisking constantly. Season with salt and pepper.
For the Salad: Place a grill pan over medium-high heat or preheat a gas or charcoal grill. Brush the fruit halves with olive oil and grill for 2 minutes on each side. On the other side of the grill cook the pancetta slices on each side, until crispy, about 1-2 minutes.
To serve: Place the arugula in a large salad bowl. Slice the grilled fruit and add to the bowl. Add the vinaigrette and toss to lightly coat the arugula. Crumble the pancetta over the top and sprinkle with the hazelnuts. Serve immediately.
My dining room needs a bit of an overhaul. The fantastically RED chairs in this photo grabbed my eye and wouldn't let go--love the color, love the lines. I'm also drawn to the chandelier, wall art, exposed brick and, of course, large open window bringing in all that light.
The brain wheels are turning trying to figure out how to create this look on the cheap. Ideas? Suggestions? Your comments are so very welcome!
From the photo stream of one of my favorite Flickr buddies...Express Monorail (aka Disney Joe). I love Animal Kingdom, love this boat and love this shot. Makes me want to start planning a Disney adventure soon!
We have a wall in our living room that needs a new look. It's 12' long and 8' high and currently houses a huge canvas print (Ikea, used via Craigslist for 50% off!) behind our TV. I don't want this wall to look too "busy" so shelving is not an option. Shelves + stuff on shelves = clutter = dust = no thanks.
My first choice would be to apply faux brick panels to give our room the feel of an urban loft (without the cost of monthy loft rent). After researching faux panels it has become clear that this idea is well beyond my budget for this project.
Enter second option: paint. If the how-to article can be trusted, we can do this for under $100 and a weekend of DIY time. We shall see. In the meantime above are two inspiration photos I found online to keep my designer juices flowing until we take on this decor adventure.
Serves: 6 Prep Time: 35 min Inactive Prep: 25 min Cook Time: 45 min
You Will Need:
1/3 cup finely crushed chocolate wafers 2 tablespoons butter, melted 1/4 cup ricotta cheese 2 ounces cream cheese 1/4 cup sugar, plus 2 tablespoons 1 orange, zested 1 egg Butter, for greasing
Special equipment: mini muffin tin
How To:
1. Preheat the oven to 350 degrees. Combine the crushed chocolate wafers and the melted butter. Place a tightly packed teaspoon of the wafer mixture into each mini-muffin cup and press down firmly.
2. In a food processor combine the ricotta cheese, cream cheese, 1/4 cup of the sugar, half of the orange zest, and the egg. Blend until smooth. Lightly grease the sides of the mini muffin tin with butter. Fill the cups with about 1 1/2 tablespoons of the cheesecake mixture. Place the mini muffin tin in a baking dish and pour enough hot water in the baking dish to come halfway up the sides of the mini muffin tin. Bake for 25 minutes.
3. Transfer the mini muffin tin to a wire rack and let cool for 30 minutes. Refrigerate for 15 minutes. Use a small knife to gently pop the cheesecakes out of the cups.
4. Just before serving, combine the remaining orange zest with the remaining 2 tablespoons of sugar. Top each individual cheesecake with about 1/4 teaspoon of the orange zest mixture and serve.
This is just the type of space I would LOVE for my office. Fresh, clean, open, white, natural light. Plenty of storage. Wall of windows with a view (well, I've got that already!)
These are the newest images listed in my Etsy shop. All are available as matted prints (various sizes), and blank note cards. Please visit my shop or contact me for more information...thanks!
All photos copyright pfeiffer photos 2008 - all rights reserved.
I'm Tina...wife, artist, student, writer, traveler, adventurer, native Oregonian, entreprenuer, photographer, decorator, foodie, music lover, Etsy fan, vintage aficionado, pragmatic, reader and blog author. My thanks to all of you who follow my musings...I truly appreciate and enjoy your participation.


