



Tuesday, May 12, 2009
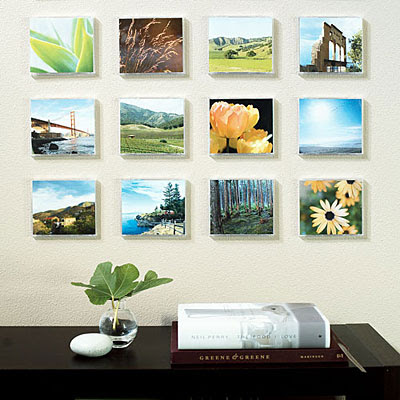
Series: Photo and Art Display - Recycled CD case grid
Recycle your unused CD cases and create a quilt-like grid collection of landscape photos.


Tuesday, April 7, 2009
Series: Displaying Art and Photography - Gallery Wall
A varied collection of art has more impact when grouped together. Set against a light-colored niche wall in the dining room, the salon-style installation below makes it a focal point and a fun conversation starter.
Steal this idea: Instead of painting an accent wall, create a quilt of artwork and hang the pieces from the ceiling to the baseboard.

Steal this idea: Instead of painting an accent wall, create a quilt of artwork and hang the pieces from the ceiling to the baseboard.

Tuesday, March 24, 2009
Series: Displaying Art and Photography - Ribbon Display
Prior to the end of the nineteenth century, pictures were often displayed on a strip of ribbon hung from a picture rail. This DIY project gives a modern twist to achieve the same effect.

Creating a changeable display
4 framed pictures 1 small empty frame 1 large empty frame 5 ft shaker tape or canvas webbing upholstery tacks drapery hooks measuring tape hammer picture nails
This project uses Shaker tape, a heavy-duty canvas strip used to weave chair seats. You can find Shaker tape at craft, sewing, and upholstery stores. Resist the temptation to use ribbon as Shaker tape is stronger, and you can pierce it without causing it to tear and fray. You can change this display frequently, without making new holes in your wall: just lift off the pictures and move the hooks. Hang one, a matching pair, or several side by side to fill up your space.
Choosing frames
Frames change the way pictures look: dark frames make them appear more vibrant, and metallic frames are reflective and draw attention to their edges. Create a floating effect by placing a larger empty frame around a small framed image instead of using a mat.
1. Calculate the length of the display by arranging photos or art on the tape and measuring. Add 1 foot, cut the tape to that length, and finish off the bottom with a V-cut.
.jpg)
2. To create a decorative hanger, loop the tape through the small empty frame, curling the cut end beneath the loop. Secure the tape to the frame with drapery tacks.
.jpg)
3. Lay the tape and pictures on a table and use a tape measure to help evenly space the frames. Attach drapery hooks to the tape at measured intervals.

4. Hang the tape on the wall and position the frames on the drapery hooks. If a picture leans forward, staple the frame to the tape from the back.

Photo credits: David Matheson for Pottery Barn.

Creating a changeable display
4 framed pictures 1 small empty frame 1 large empty frame 5 ft shaker tape or canvas webbing upholstery tacks drapery hooks measuring tape hammer picture nails
This project uses Shaker tape, a heavy-duty canvas strip used to weave chair seats. You can find Shaker tape at craft, sewing, and upholstery stores. Resist the temptation to use ribbon as Shaker tape is stronger, and you can pierce it without causing it to tear and fray. You can change this display frequently, without making new holes in your wall: just lift off the pictures and move the hooks. Hang one, a matching pair, or several side by side to fill up your space.
Choosing frames
Frames change the way pictures look: dark frames make them appear more vibrant, and metallic frames are reflective and draw attention to their edges. Create a floating effect by placing a larger empty frame around a small framed image instead of using a mat.
1. Calculate the length of the display by arranging photos or art on the tape and measuring. Add 1 foot, cut the tape to that length, and finish off the bottom with a V-cut.
2. To create a decorative hanger, loop the tape through the small empty frame, curling the cut end beneath the loop. Secure the tape to the frame with drapery tacks.
.jpg)
3. Lay the tape and pictures on a table and use a tape measure to help evenly space the frames. Attach drapery hooks to the tape at measured intervals.

4. Hang the tape on the wall and position the frames on the drapery hooks. If a picture leans forward, staple the frame to the tape from the back.

Photo credits: David Matheson for Pottery Barn.
Wednesday, February 18, 2009
Series: Photo and Art Display - Snapshot Solution
Snapshots tell stories. Our stories, others stories, random memories and moments frozen in time. When framed alone, they can be too small to capture attention. To give them more presence try this creative display idea.

Displaying photos by color
Grouping photos by color gives them visual unity (often not easy with 4x6 or 5x7 size prints), and it leaps outside of the traditional, "just-another-photo-getting-lost-on-my-wall" placement. If you've got more small prints (4x6, 5x7) than you know what to do with, this is a project you can put together in one afternoon.
Supplies:
2 poster frames, 22 x 28 in (56 x 71 cm)
Poster board or gator board (sold in art-supply stores)
Archival glue
Brayer
Measuring tape
A note about photo adhesives
Photo-safe adhesives include archival-quality photo corners, acid-free linen and paper tape, archival glue, and wheat and rice starch pasted hinges which are the best option for fragile, valuable images)
Do not use cellophane tape, rubber cement, or any hobby glue to adhere
photos to a backing as these will all damage photos over time.


4. Let dry overnight, then set your finished collage into the poster frame and measure from the frame to the wire (as shown), to determine placement on your wall.
Photo credit: Matheson, David. "How To Images." Photographs. Moss, Samantha. Singapore: Weldon Owen, Inc., 2005, 38-41.

Displaying photos by color
Grouping photos by color gives them visual unity (often not easy with 4x6 or 5x7 size prints), and it leaps outside of the traditional, "just-another-photo-getting-lost-on-my-wall" placement. If you've got more small prints (4x6, 5x7) than you know what to do with, this is a project you can put together in one afternoon.
Supplies:
2 poster frames, 22 x 28 in (56 x 71 cm)
Poster board or gator board (sold in art-supply stores)
Archival glue
Brayer
Measuring tape
A note about photo adhesives
Photo-safe adhesives include archival-quality photo corners, acid-free linen and paper tape, archival glue, and wheat and rice starch pasted hinges which are the best option for fragile, valuable images)
Do not use cellophane tape, rubber cement, or any hobby glue to adhere
photos to a backing as these will all damage photos over time.
How To:
1. Cover a table with newspaper and gather all your unused photo prints that have yet to find a home in an album or frame. Sort the images by dominant color, blue for sky and water, red for the flowers from your last summer garden, etc. Try to have a good mix of people, places and things in each color stack.

2. Create a rough layout on your poster (or gator) board, keeping in mind the depth of your poster frame. Layer the photos to "crop" out parts your are not as partial to and to highlight the more interesting features.

3. When the arrangement is to your liking, use the archival glue or tape to secure the images to the board. Roll the edges of all the prints with a brayer to ensure they are firmly in place.

4. Let dry overnight, then set your finished collage into the poster frame and measure from the frame to the wire (as shown), to determine placement on your wall.
Last week I posted a simple question in the community forum on Etsy: "Why don't YOU buy fine art photography?" The response was overwhelming! The answers were varied, and there were some that popped up multiple times in the course of the thread. Most were about display concerns (ease of install, lack of space), size of prints (larger is popular--who would have guessed?!), and issues with framing (what to use, how to do, how many to choose, etc.)
This post is PART ONE in my new series called Creative displays for photography & art. I am writing this series with the hope of sharing fresh ways to look at your fine art and fine art photography pieces and to inspire you to seek out more. Please visit again for future posts with ideas, how-tos and photos to push the traditional "frame-it-hang-it" aside and have more FUN in your space!
This post is PART ONE in my new series called Creative displays for photography & art. I am writing this series with the hope of sharing fresh ways to look at your fine art and fine art photography pieces and to inspire you to seek out more. Please visit again for future posts with ideas, how-tos and photos to push the traditional "frame-it-hang-it" aside and have more FUN in your space!
Photo credit: Matheson, David. "How To Images." Photographs. Moss, Samantha. Singapore: Weldon Owen, Inc., 2005, 38-41.
Friday, February 6, 2009
DIY Projects: Kitchen Art, Dresser
Last weekend I switched out the art in my kitchen. I've had this poster, Plaza after the Rain, hanging by my stove for almost six years. I was photographing all my projects from last term's drawing class when inspiration hit. Why not reuse the frame to display MY art in my kitchen?

before (Plaza after the Rain poster, 20" x 30" by Paul Cornoyer)
The after photo is one of my charcoal drawings sans frame. It's now hanging boldly, graphically, and proudly in my kitchen. There are other projects brewing for my kitchen so stay tuned for future improvements.

after (charcoal negative space drawing, 18"x24" by me)
Last weekend I also decided to do something about our bedroom. You might remember a few weeks back I shared a few photos of our home. The kitchen and bedroom pics were so cleverly titled as "snippets"...and with good reason. In six years we have still not settled on a decor plan for our bedroom, and, sadly, it has become both a catch-all room (read: boxes of stuff that need to go to the garage) and the bain of my decorating existence.
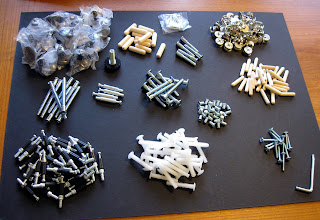
The storage (or rather the lack thereof) is far less than efficient. We paid a visit to what I consider a home furnishings nirvana land--Ikea. We selected the grand-daddy 8-drawer HEMNES dresser in the infamous brown-black color. We redeemed a gift card from Christmas.
The plan was in motion.

Carrying it home in our 2-door coupe (same car, different color) was exciting enough, and as you see, I promptly opened the packages and piled up the hardware. I actually like assembling things myself, especially since it saves us money. No, these aren't family heirloom pieces but life is short. I'm thankful for Ikea's marketing savvy as it allows us to change our look as we change our mind!


before (Plaza after the Rain poster, 20" x 30" by Paul Cornoyer)
The after photo is one of my charcoal drawings sans frame. It's now hanging boldly, graphically, and proudly in my kitchen. There are other projects brewing for my kitchen so stay tuned for future improvements.

after (charcoal negative space drawing, 18"x24" by me)
Last weekend I also decided to do something about our bedroom. You might remember a few weeks back I shared a few photos of our home. The kitchen and bedroom pics were so cleverly titled as "snippets"...and with good reason. In six years we have still not settled on a decor plan for our bedroom, and, sadly, it has become both a catch-all room (read: boxes of stuff that need to go to the garage) and the bain of my decorating existence.

The storage (or rather the lack thereof) is far less than efficient. We paid a visit to what I consider a home furnishings nirvana land--Ikea. We selected the grand-daddy 8-drawer HEMNES dresser in the infamous brown-black color. We redeemed a gift card from Christmas.
The plan was in motion.

Carrying it home in our 2-door coupe (same car, different color) was exciting enough, and as you see, I promptly opened the packages and piled up the hardware. I actually like assembling things myself, especially since it saves us money. No, these aren't family heirloom pieces but life is short. I'm thankful for Ikea's marketing savvy as it allows us to change our look as we change our mind!

Of course, right after I unpack all the pieces and the packets of hardware, I get the smack down with this head cold. So my project sits waiting for me to return to the land of the living. Sometimes I just have to hit that pause button...*sigh*
Hope you all have a very relaxing weekend!
Saturday, August 23, 2008
Pfeiffer Photos - Adorn your walls today!


All of our photos are available in multiple sizes and as blank (all occasion) note cards. Buy any four (4) of our 4 x 6 or 5 x 7 images and save $4. Shipping is free to addresses within the USA 48. International customers and special request orders are welcome!
Subscribe to:
Posts (Atom)


